")
The Wedding Photographer’s Timeline Guide
As wedding photographers, we wear a lot of hats and we juggle a lot of responsibilities – one of those unofficial titles we seem to fall under is ‘wedding planner’.
After all, our couples have most likely never planned a wedding before, and have possibly never even been in a bridal party – they don’t know the ins and outs of what goes on in a wedding day like we do, so it’s our proud responsibility to guide them. A smooth timeline makes for a happy couple AND a happy photographer!
Our couples love the role we play in planning out their wedding day timeline, and we love the control it gives us over managing efficient and stress-free portrait time. Creating a timeline is one of the perks of our client experience, and it should be one of yours too!
We’re going to walk you through our process of laying out a wedding day timeline, how we communicate with our couples to get the information we need, and the reasoning for each of our decisions when planning out our every move. We’ll even show you how we design a beautiful timeline graphic to refer to throughout the wedding day. Keep scrolling to get the secret to our wedding day timeline success with our ‘Wedding Photographer’s Timeline Guide’!
Communication
The first step to creating an efficient timeline is clear communication. We find that a questionnaire is the perfect starting point – chances are, your couple already knows the times they and their venue have scheduled for the ceremony, cocktail hour, and reception. These main points in the schedule will shape your timeline.
Our couples receive 10 hours of coverage, and we know we typically stay until the cake has been cut (60-90 minutes before the end of the reception). For that reason, we work backwards to determine our starting time, and adjust as needed. Our questionnaire will tell us whether or not our couples is doing a first look, or any other additional first look (such as a father/daughter), which will also influence our timeline.
Bride in Hiding
We always wrap up portraits by 30 minutes before the ceremony begins for ‘bride in hiding’ – this ensures that guests will not see the bride as they arrive early, and also gives us the time to photograph ceremony details and prepare for the ceremony to begin.
Example: The reception ends at 11pm, and cake is being cut at 9:30pm. That gives us a starting time of 11:30am. Cocktail hour is 6-7, Ceremony is 5:30pm-6:00pm, so we know we need to be done with portraits by 5pm. Our couple is doing a first look, so we’re able to schedule portraits from 3-5pm, including bridal party and family, which means we want to be finished with ‘getting ready’ by 2:45pm. That essentially means we’ll have three hours dedicated to the getting ready portion of the day, which fits our needs of one hour for detail shots, 30 minutes for bridesmaids robes/PJ’s shots, an hour for the ‘getting dressed’ portion, and thirty minutes of cushion time!
Shot List and Additional Information
At the time of our questionnaire, we also may request that our couple give us a detailed list of each combination they want photographed during bridal party and family portraits. The information we get from that list will tell us how much time we will need for each portrait portion of the day – for example, if there are only 3 bridesmaids and 3 groomsmen, and the couple each have only one sibling and two parents, we know we can use the large portion of our time for bride and groom portraits. Whereas, if there are large families on each side with 24 people in the bridal party, we’ll have a tighter timeline. Writing a checklist in our phones allows us to check off each combination as we go, which will also keep us in a tight and organized timeline.
Our Basic Timeline
Our ideal timeline will factor in at least one hour for detail shots during getting ready, thirty minutes for bridesmaids robes/PJ’s photos, and an hour for the getting dressed portion. We like 60-90 minutes with the groom during getting ready, as men typically don’t take as long. We always encourage a first look, and that will take place immediately after getting ready is finished, which will lead into couples portraits, and bridal party and immediate family portraits. If we could secure an hour for couples photos, and 45 minutes to an hour of family and bridal party portraits, that is ideal. Thirty minutes before the ceremony, we wrap up and take photos of the ceremony space as guests start to arrive. Immediately after the ceremony, we will take any extended family portraits (if requested by the couple), and from there, we will take some shots of decor and mingling in cocktail hour, then spending the majority of that time capturing the reception space while it’s empty, documenting the decor, sweetheart table, cake, etc. If our couple is willing, we love to pull them out of the reception for 10 minutes during golden hour for some extra, dreamy portraits! After the cake has been cut and any additional traditions is when we wrap up for the night!
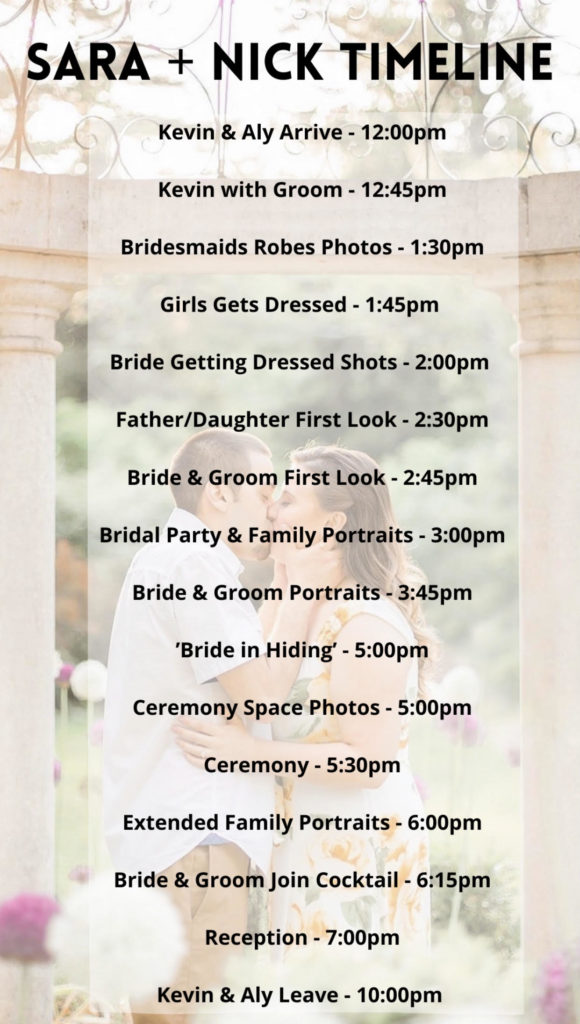
Designing the Timeline
As photographers, we are visual people, and we love turning our timelines into something aesthetically pleasing as well as conventional! Using a free online resource like Canva, or even InDesign if you’re feeling extra crafty, is a great way to lay out your timeline in a beautiful way that you can refer to throughout the day, as can your couple and anyone in their bridal party or additional vendors! Take a look below at a timeline from a recent wedding we photographed.
Wedding Photographer’s Timeline Guide Tips
When creating a timeline, be sure to add on cushion time to avoid anything overlapping. We find that at a typical wedding day, hair and makeup will go over its scheduled time by at least 30 minutes, so we advise our couples to tell their hair and makeup team that they need to be finished 30 minutes earlier than they actually do. Our bride in hiding time doubles as an extra cushion – if we need an extra 10 minutes during group portraits, we can conveniently pull from there. Always underestimate your available time for something rather than overestimate, as it’s better to have extra cushion time than to run behind schedule!
Wedding Photography Education
A photographer’s timeline can make or break the success of their client experience, and we hope this Wedding Photographer’s Timeline Guide has helped you to shape the perfect schedule for your next wedding day! For additional wedding photography education, including free resources, visit our website and check out our reels on Instagram!
When we first started our business, we were spending hours in photoshop correcting in-camera mistakes, wasting valuable time trying to book clients we weren’t compatible with, and dropping hundreds of dollars on ads and memberships that weren’t profitable – now, we’ve seen our work on People Magazine’s website, have won awards recognizing our positive client experience, and even get to travel to resorts on tropical islands to serve clients we love! Now, we’ve created resources to help your business grow the same way ours has, whether you’re trying to rock Instagram, figure out your SEO, or develop a new Inquiry & Booking System, we’ve got you covered. We even have an engagement session style guide. Let’s do this, friend, and thanks for reading!
TAKE ME TO THE TOP
@2020 KEVIN & ALY PHOTOGRAPHY, ALL RIGHTS RESERVED
SITE DESIGN BY DAVEY & KRISTA
Join the list


ELSEWHERE
FIND YOUR WAY Around
HOME
MEET
WEDDINGS
The Blog
CONTACT
on instagram
follow along with us
@kevinandalyphotography
EST. 2016


